How to Test a Sump Pump Safely
Test your sump pump with water, check the float and discharge, spot warning signs, and know when to call a plumber.
- Difficulty
- Beginner-friendly
- Time
- 15–30 minutes
- Est. cost
- $0
- Season
- year round
By Keepstead Editorial Team · Published September 6, 2026 · 7 min read
Last reviewed September 6, 2026
Quick answer
To test a sump pump, inspect the pit and discharge path, then slowly pour clean water into the pit until the float rises. The pump should start, lower the water, and shut off without grinding, cycling rapidly, or leaving the pit unusually full. Test a backup pump separately according to its manual. Stop if the outlet, cord, or surrounding floor is wet or damaged.
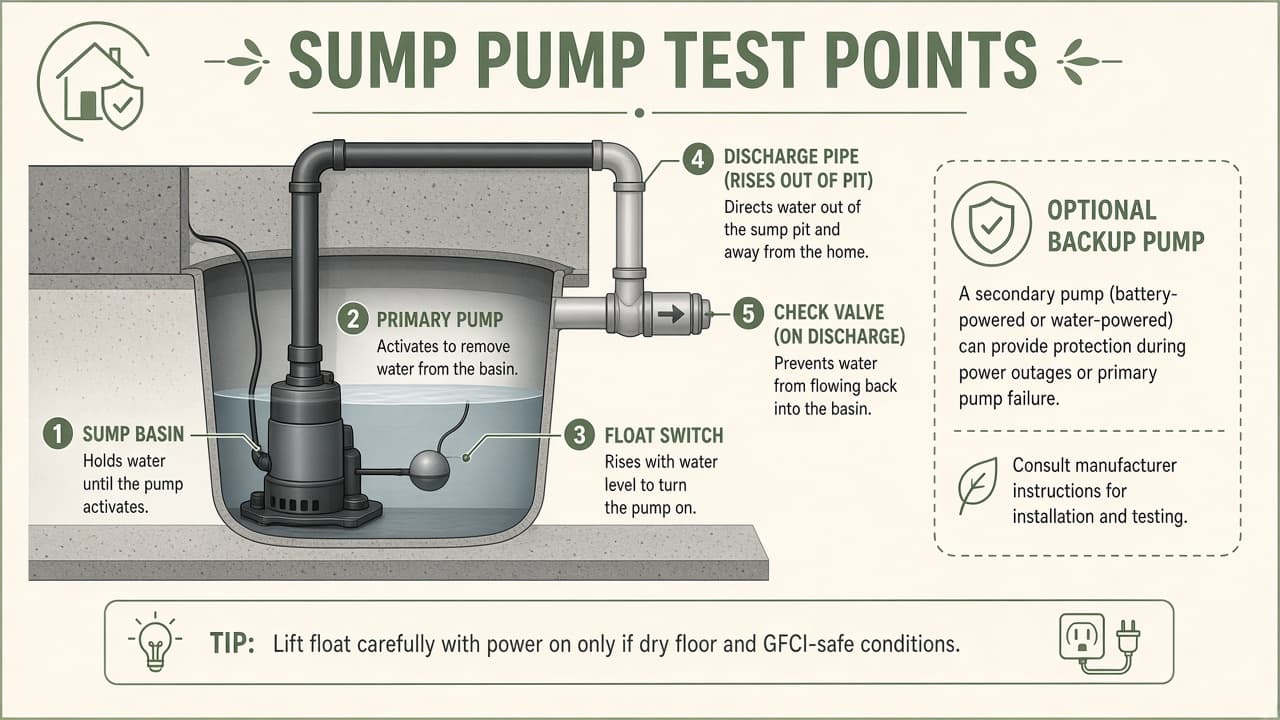
A sump pump sits in a basin at the lowest part of a basement or crawl space. Groundwater drains into the pit, the rising water lifts a float switch, and the pump sends water outside through a discharge pipe. It does not prevent water from entering the drainage system; it moves that water away before it reaches the floor.
Testing takes only a few minutes and can reveal a stuck float, failed motor, or blocked discharge before a storm.
When to test your sump pump
- Every three to four months
- Before a rainy season, major storm, or spring snowmelt
- After a prolonged power outage
- After work near the pit, outlet, or discharge pipe
- Whenever the pump sounds different or the pit stays higher than usual
Add the test to your annual home maintenance schedule, even if the pump rarely runs.
Before you add water
Check these items visually:
| Check | What you want to see | Warning sign |
|---|---|---|
| Pit | Open enough for the float to move | Debris, mud, or objects blocking float |
| Pump | Upright and stable | Pump tilted, loose, or heavily corroded |
| Power cord | Intact and plugged directly into its intended outlet | Fraying, heat damage, or extension cord |
| Discharge pipe | Connected and supported | Loose joint, crack, or active leak |
| Outdoor outlet | Clear path away from foundation | Ice, soil, leaves, or standing water blocking flow |
| Check valve | Pipe holds water without repeated backflow sounds | Water rushes back and pump restarts repeatedly |
Do not remove guards or open electrical parts. If the pit has a sealed radon cover, follow the cover and mitigation-system instructions; do not break the seal casually.
How to test a sump pump with water
Tools needed
- Clean bucket or watering can
- Clean water
- Flashlight
- Towels for small splashes
- Phone or notebook for the test date
- Inspect from above — Confirm the float has room to move and the discharge pipe is connected.
- Check the outdoor discharge — Make sure the visible outlet is not buried, frozen, or blocked.
- Pour clean water slowly — Aim into the pit without splashing the outlet or cord. Do not dump a heavy bucket onto the pump or float.
- Watch the float rise — The switch should activate before water reaches the top of the pit.
- Confirm water moves out — The level should fall steadily. If another person watches the outdoor outlet, they should stay clear of the flow.
- Watch the shutoff — The pump should stop after the water drops. It should not keep running dry or restart every few seconds.
- Record the result — Note the date, noises, and any change in run time.
One controlled cycle is usually enough. Repeatedly filling the pit does not make the test more reliable and can overwhelm a weak or blocked system.
What a normal test looks like
| Observation | Usually means |
|---|---|
| Pump starts as float rises | Float switch and power are responding |
| Water level drops steadily | Pump and discharge path are moving water |
| Pump stops at a consistent low level | Float returns normally |
| Brief water movement after shutoff | Some pipe drainage may be normal |
| Pump immediately restarts several times | Check valve, float, or discharge problem |
Listen for a steady motor sound. Loud grinding, rattling, humming without flow, or a burnt smell is not normal.
Check the float switch
The float is the pump's automatic trigger. It may be a tethered float, a vertical sliding float, or an internal switch.
- Remove loose objects around it without reaching into a powered pit.
- Confirm a tethered float is not caught against the wall or discharge pipe.
- During the water test, watch for smooth travel rather than lifting it by hand.
- If the pump only starts when the float is jostled, schedule service.
Do not tape a float up, bypass the switch, or force the pump to run continuously.
Check the discharge path
Follow the visible pipe from the pump toward the wall and then locate its outdoor endpoint.
- Water should discharge away from the foundation.
- The pipe should not leak at accessible joints.
- The outlet should remain clear of leaves, soil, snow, and ice.
- A check valve should limit water draining back into the pit.
Do not disconnect a pressurized pipe during a test. Buried, frozen, or repeatedly blocked discharge lines need professional evaluation.
What about a backup sump pump?
A battery-powered or water-powered backup can help when the primary pump fails or utility power goes out. It is a separate system, not proof that the primary pump is healthy.
Test the backup by following its manufacturer instructions. Confirm its alarm works, check the battery age and condition, and record both primary and backup tests. Do not disconnect or short battery terminals, and do not modify a water-powered backup connection.
Warning signs that need attention
- Pump does not start as water rises
- Motor hums but water level does not fall
- Breaker or GFCI trips during the test
- Pump runs continuously after water is low
- Rapid on-off cycling
- Grinding, banging, smoke, or burnt odor
- Visible corrosion, cracked housing, or leaking discharge joints
- Water returns quickly through the discharge pipe
- Pit approaches overflow
If water is actively entering faster than the pump can remove it, move valuables to a dry location and call for help. For uncontrolled water elsewhere in the home, use the burst pipe and water leak emergency checklist and know how to find your main water shutoff.
When to call a professional
For help deciding whether a plumbing task is within homeowner scope, see when to call a plumber vs DIY.
Bottom line
Test with clean water, not by pulling wires or forcing the float. A healthy sump pump starts automatically, lowers the water steadily, and stops cleanly. A short test now is easier than discovering a failed pump during heavy rain.
Frequently asked questions
- How often should I test my sump pump?
- Test it every few months and before the rainy season, a major storm, or snowmelt. Also test after a power outage or any maintenance around the pit.
- How much water should I pour into a sump pit?
- Add clean water slowly until the float rises and starts the pump. Stop pouring once the pump starts; the exact amount depends on pit size and float setting.
- What if the sump pump hums but does not remove water?
- Disconnect power from a dry location and call a plumber or pump technician. A jammed impeller, blocked discharge, or failing motor needs diagnosis before the pit fills further.
- Do I need a battery backup sump pump?
- A backup is worth considering if outages are common, the basement has finished space, or the primary pump runs often. It still needs periodic testing and battery replacement according to its manual.
Related guides
How to Find Your Main Water Shutoff Valve
Locate your home's main water shutoff—basement, crawl space, slab, or meter—and know when to use it vs under-sink shutoffs before a leak emergency.
When Should You Call a Plumber Instead of DIY?
Toilet running, slow drain, or leak at the wall? See which plumbing jobs are safe DIY—and which need a licensed plumber before you start.
Burst Pipe or Water Leak Emergency Checklist
What to do when a pipe bursts or water is flooding—shut off water, power safety near water, limit damage, and when to call a plumber immediately.
Annual Home Maintenance Schedule for New Homeowners
Plan yearly home maintenance by season—HVAC, plumbing, safety devices, exterior, and systems—with links to detailed checklists.
This guide is for general informational purposes. Conditions vary by home, local codes, and equipment. See our disclaimer.