Water Heater Leaking: What to Do First
Find where a water heater is leaking, shut it down safely, limit damage, and tell when a fitting or failed tank needs a plumber.
- Difficulty
- Beginner-friendly
- Time
- 10–20 minutes to assess
- Est. cost
- Varies
- Season
- year round
By Keepstead Editorial Team · Published September 6, 2026 · 8 min read
Last reviewed September 6, 2026
Quick answer
If a water heater is leaking, keep clear of hot water and wet electrical equipment. Close the cold-water inlet valve if it is dry and safe to reach; otherwise use the main water shutoff. For an electric heater, switch off its labeled breaker only from a dry, safe panel. For gas, do not attempt repairs or relighting; if you smell gas, leave and contact the gas utility or emergency services from outside.
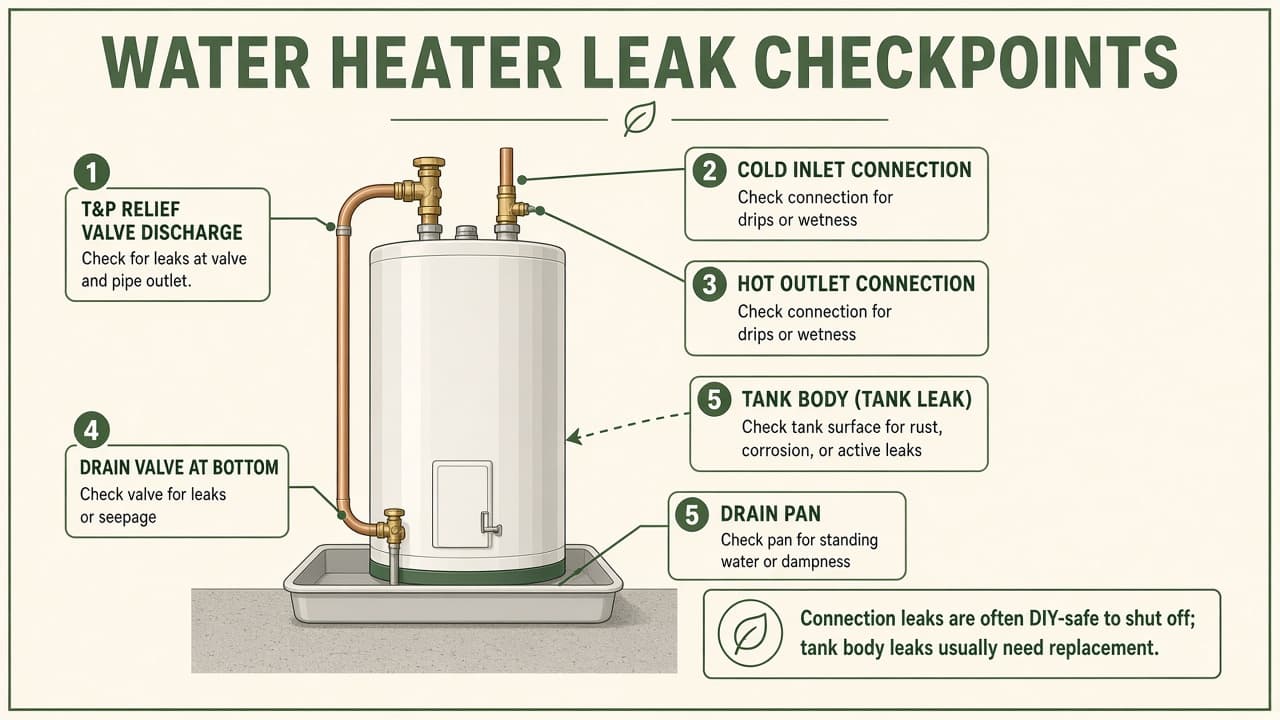
A puddle near a water heater may come from a pipe connection, temperature-pressure relief system, drain valve, condensation, or the tank itself. The source matters: an external fitting may be repairable, while water from the tank shell or bottom seam usually means replacement.
Your first job is not to disassemble the heater. It is to make the area safe, reduce incoming water, and identify where moisture begins.
Immediate steps
- Keep people away — Water may be hot enough to scald, and a wet floor may be electrically hazardous.
- Look and listen from a safe distance — Note active spraying, gas odor, sizzling, arcing, or a bulging tank.
- Stop incoming water if safe — Close the cold-water inlet valve above the heater. If it is inaccessible, leaking, or ineffective, close the main water.
- Address the energy source safely — Follow the electric and gas boundaries below.
- Call a plumber — Describe the leak location, flow rate, heater type, and whether water is off.
- Limit damage — Move belongings only when the floor and nearby electrical equipment are safe.
For a fast-moving leak or flooding beyond the heater area, follow Keepstead's burst pipe and water leak emergency checklist.
Electric and gas safety
| Heater type | Safe homeowner response | Do not do |
|---|---|---|
| Electric | Turn off the clearly labeled water-heater breaker only if the panel and path are completely dry and undamaged | Do not remove access covers, test internal wiring, or touch a wet heater |
| Gas | Keep clear and call for service; follow the manufacturer's emergency information | Do not troubleshoot gas controls, relight the burner, disconnect gas, or modify venting |
| Heat-pump / hybrid | Use the labeled disconnect or breaker only when dry and clearly identified | Do not open electrical or refrigerant sections |
Turning off water does not de-energize an electric heater. Turning off power does not stop incoming water. Treat those as separate controls.
Find where the leak starts
Dry observations are more useful than looking only at the puddle. Water runs down pipes and tank jackets, so the wettest point on the floor may not be the source.
| Leak location | What it may mean | Response |
|---|---|---|
| Cold inlet or hot outlet connection | Loose, corroded, or failed fitting | Shut off water; plumber repair |
| TPR valve body or discharge pipe | Valve fault, excess pressure, or excess temperature | Do not cap; plumber diagnosis |
| Drain valve near bottom | Valve not fully seated, damaged, or leaking at threads | Do not force; plumber repair |
| Tank side, seam, or jacket | Internal tank corrosion or rupture | Replacement is usually required |
| Water beneath tank with no dry external source | Tank failure, hidden connection leak, or condensation | Shut down safely; professional assessment |
| Flue or combustion area on gas model | Venting or combustion issue, possibly mixed with condensation | Keep clear; qualified professional |
Use a flashlight from a dry position. Do not remove covers or insulation to chase the source.
Connection leak vs tank leak
A likely connection leak
- Moisture begins at a visible threaded or soldered fitting
- The tank jacket remains dry above and below that connection
- Dripping changes when the inlet valve is closed
- Corrosion or mineral deposits concentrate around one fitting
Connections may be repairable, but hot water, pressure, corrosion, and nearby energy sources make plumber service the conservative choice.
A likely tank failure
- Water appears through the metal jacket or bottom seam
- Rust streaks run from beneath the outer shell
- The insulation or lower access area is saturated
- Water returns after the exterior is dried
- The tank is bulging, split, or releasing water rapidly
A corroded storage tank cannot be patched safely from the outside. Plan for replacement.
Temperature-pressure relief valve leaks
The TPR valve is a safety device that releases water when temperature or pressure becomes unsafe. It usually has a lever and a discharge pipe leading downward.
- Never plug, cap, clamp, or reduce the discharge pipe.
- Do not hold the lever closed.
- Keep clear of the outlet because discharged water may be scalding.
- Have a plumber determine whether the valve itself, thermal expansion, pressure, or overheating caused the discharge.
Repeated discharge is a safety warning, not a nuisance drip to seal.
Drain-valve leaks
The drain valve sits near the bottom of a tank heater and is used during maintenance.
If it is dripping, do not apply excessive force or attach a permanent cap as a substitute for repair. Plastic valves can crack and corroded metal valves can fail when disturbed. Shut off incoming water and arrange service.
Shut off the water
Look for the valve on the cold-water pipe entering the heater, normally above or beside the unit. The appliance shutoff valve guide explains common valve types and locations.
- Approach only if the floor and valve area are dry and there is no gas odor.
- Turn a multi-turn valve gently clockwise, or rotate a quarter-turn lever perpendicular to the pipe.
- Do not force a seized or corroded valve.
- If flow continues, close the main water shutoff.
Closing the inlet limits replacement water, but a full tank still holds many gallons. Do not improvise a drain procedure during an unsafe active leak.
Limit water damage
- Place a container under a slow drip only if it can be done without approaching electrical or scald hazards.
- Move boxes, rugs, and stored items from the dry edge of the area.
- Photograph the leak and damaged property.
- Use towels or a wet vacuum only after power hazards are controlled and the equipment is suitable for wet use.
- Watch nearby drywall, ceilings below, and flooring for spreading moisture.
Do not run fans, vacuums, or extension cords through standing water.
Repair or replace?
| Finding | Typical outcome |
|---|---|
| Failed supply connector or accessible fitting | Often repairable |
| Defective TPR valve after cause is diagnosed | Valve may be replaceable |
| Damaged drain valve | Often repairable by plumber |
| Tank seam or shell leak | Replace heater |
| Extensive corrosion around multiple points | Replacement may be more practical |
| Gas, vent, wiring, or combustion issue | Licensed trade professional required |
Age alone does not prove a tank failed, but an older corroded tank with a shell leak is not a good repair candidate.
After the leak is controlled
Do not restore power to an electric heater until the tank is completely full, air has been purged according to the manufacturer, and a professional has confirmed wet components are safe. Do not relight or restart a gas heater after a leak unless the manufacturer procedure and qualified service guidance say it is safe.
Once repaired, use the water heater homeowner maintenance guide to plan visual checks and manual-specific maintenance.
When to call a professional
Bottom line
Treat a leaking water heater as both a water problem and an energy-safety problem. Stop incoming water only when access is safe, avoid gas and electrical repair steps, and use the leak location to tell a repairable connection from a failed tank.
Frequently asked questions
- Is a leaking water heater an emergency?
- It can be. A ruptured tank, fast leak, water near electrical equipment, gas odor, or hot-water spray needs immediate action and professional help. A few drops still need prompt diagnosis because small leaks can worsen.
- Can a leaking water heater be repaired?
- Loose or failed external connections, drain valves, and relief valves may be repairable. Water escaping through the tank body or bottom seam usually means the tank itself has failed and needs replacement.
- Should I shut off water to a leaking water heater?
- If the cold-water inlet valve is dry, accessible, and safe to reach, close it gently. If it will not stop the flow or the area is unsafe, use the main water shutoff and call a plumber.
- Why is the water heater leaking from the relief pipe?
- The temperature-pressure relief valve may be reacting to excessive temperature or pressure, or the valve may have failed. Do not cap the pipe or disable the valve; have a plumber diagnose the cause.
Related guides
How to Find Your Main Water Shutoff Valve
Locate your home's main water shutoff—basement, crawl space, slab, or meter—and know when to use it vs under-sink shutoffs before a leak emergency.
Appliance Shutoff Valves: A Homeowner's Guide
Find and identify shutoff valves for washers, dishwashers, refrigerators, water heaters, toilets, and sinks before a leak.
How to Maintain a Water Heater: Homeowner Checklist
Gas and electric water heater checklist—flush sediment, test the TPR valve, inspect gas vents, check the anode, and know when to call a plumber.
When Should You Call a Plumber Instead of DIY?
Toilet running, slow drain, or leak at the wall? See which plumbing jobs are safe DIY—and which need a licensed plumber before you start.
This guide is for general informational purposes. Conditions vary by home, local codes, and equipment. See our disclaimer.